Showing posts with label 3d project. Show all posts

Tuesday, April 12, 2016

Fiesta time: MINI Paper Pyramid Pinata!

Mini Pyramid Pinata


I LOVE the following things:
-pinatas
-candy, candy, candy
- anything mini
-paper
-bright colors

I got this swanky idea just a week before my Saleabration Celebration FIESTA from the Stampin' Up blog. Sue Plote, one of Stampin' Up's talented Artisan Designers, takes you through step by step how to make it! Make aure and click to her blog for the full instructions! This treat showcases the Stampin' Up Pyramid Pals Thinlit die, balloon punch and Cherry On Top designer series paper.

 I used my perfectly sized Paper Pumpkin stamp from the March Kit for the "Just For You" sentiment. I LOVE the fun and festive color scheme for an absolute party-  Watermelon Wonder, Daffodil Delight and Bermuda Bay. Sue used the It's My Party suite for hers and they are just as bright and cute! 

Here's what the bottom of the candy spewing wonder looks like!


 Simply pull on the string! (pull gently and you can reuse it!) No messy bats and crazy, screaming, kids screaming. It's just this adorable project, you and some m&m's! 
TIP: I did use Tear and Tape adhesive with little knot at the end of the string just to make good and sure the string won't pull back through the hole.  


***Try it!  Post a picture here if you make one. I'd love to see multiple patterns of these cuties! ***  

Shop 24/7 for all your stampin' supplies in my online store, here!   If you spend $150, you get FREE goodies!!!

Save BIG! for the BEST DEAL! Join my papermadeprettier team of happy shoppers!  It's $125 in merchandise of  your choice for only $99 AND free shipping! plus 20% on all future purchases!

Host To hostess an event in the Central Arkansas area, email me cogbill22@yahoo.com

Follow papermadeprettier on Pinterest and Facebook! and Instagram!

Sign up for my email newsletter and don't miss creative inspiration, regular updates, tutorials, and special offers from papermadeprettier (Kay Cogbill)!


Saturday, November 16, 2013

12 days of Stampin' up Christmas projects from papermadeprettier, DAY 12

I LOVE BANNERS!  See previous post re: banners and how to make them: BANNERMANIA


Day 12:
Joy Banner


 I had enough left over from the kit that I embellished a dollar store candle:
 
 
 Thanks for reading! 

Missed day 1?  It's here.  Don't miss a day! subscribe to my blog today

Order stampin' supplies here at my online store 24/7.

Like papermadeprettier on Facebook and Pinterest!

Sunday, November 10, 2013

12 days of Stampin' up Christmas projects from papermadeprettier, DAY 5

 5 golden rings....! Well,  not really. But a gift card holder?  YES!  Let's face it, sometimes a gift card is just the way to go for someone, but you really want to personalize it for Christmas. I have your solution and it's simple and easy with Stampin' Up products. 
 

Day 5:
Holly Jolly gift card holder


Here is what it looks like on the inside:


Doesn't the double-sided paper must really pop here? LOVE IT!

Here's a close up of the front, sparkles galore. 


 Stampin' Up supplies used:
Paper: season of style designer series paper, whisper white 8 1/2" x 11" card stock
Stamp set: Tags 4 you
Ink: old olive and cherry cobbler stampin' write
adhesive: stampin' dimensionals, glue dots, snail adhesive
tools: word window punch, scallop border punch, label bracket punch
embellishments: basic rhinestones, cherry cobbler buttons (regals collection)
ribbon: cherry cobbler 1/2" seam binding ribbon

Details:
Cut designer paper 11" x 3" (that means you can get 4! out of ONE SHEET of designer paper- LOVE!)  Score at 3 1/2"  and 7 3/4" and fold. On smaller end section, punch word window punch about 3/4" in from edge. On one end, punch word window punch . Punch scallop border on other end of card holder.  Embellish with buttons and basic rhinestones.  Color 'Have a holly jolly" with old olive and cherry cobbler markers and stamp onto whisper white paper and punch with label bracket punch.  Embellish with rhinestones.  Cut 1/2 inch slit about 1/2" in from scalloped edge for ribbon to go through. Cut approx. 20" of cherry cobbler ribbon and thread through the slit and around back, then to side to tie. Attach white punched label to card with stampin" dimensionals on top and bottom edges so that ribbon can thread under it.
 
Stay tuned tomorrow for day #6. Missed day 1?  It's here.  Don't miss a day! subscribe to my blog today

Order stampin' supplies here at my online store 24/7.

Like papermadeprettier on Facebook and Pinterest!

Saturday, November 9, 2013

12 days of Stampin' up Christmas projects from papermadeprettier, DAY 4

 
 Welcome to day 4!  The winter frost designer series paper is just so pretty.  If you missed the card yesterday, make sure to check it out. Now for an ornament. You can NEVER NEVER have too many ornaments. If you run out of room, get another tree!  That's exactly what Clark Cogbill says, NOT! 
 

Day 4:
Winter frost ornament


Isn't it fabulous!  And it's easy with the festive flurry framelits for the Big Shot:


MORE SPARKLE!!!

Stampin' Up supplies used:
Paper: winter frost designer series paper, whisper white 8 1/2" x 11" card stock, silver  glimmer paper
Ink: coastal cabana, and pool party classic ink pad; pool party and island indigo marker
Big Shot: festive flurry thinlits die
adhesive: stampin' dimensionals, glue dots
embellishments: basic rhinestones, large rhinestones, frosted finishes
ribbon: pool party 1/2" seam binding ribbon

Details:
Cut base of ornament from striped winter frost paper.  Adhere large rhinestones to all points.  Stamp next largest snowflake with coastal cabana on whisper white paper and cut with framelit on Big Shot.  Cut silver snowflake with framelit. Color smallest snowflake with pool party and island indigo (in center). Adhere frosted finished embellishment with glue dot to center of smallest snowflake. Build them together with stampin' dimensionals.  pool party card stock at 5 1/2 and fold.  Cut designer paper 5 1/4" x 4" and layer with snail adhesive. Stamp snowflakes on whisper white paper and cut them out with the festive flurry framelits. The magnetic platform is a dream here!  Cut out silver snowflake with Big Shot. Adhere stamped snowflakes to card with snail adhesive and glittered snowflake with stampin' dimensionals. Loop and attach ribbon to back, tie another ribbon around and put a large rhinestone on it!  You can also punch out a large snowflake to back it so that the ribbon won't show. 
 
Stay tuned tomorrow for day #5. Missed day 1?  It's here.  Don't miss a day! subscribe to my blog today

Like papermadeprettier on Facebook and Pinterest!

Thursday, November 7, 2013

12 days of Stampin' up Christmas projects from papermadeprettier, DAY 2


 Welcome back!
Christmas is all about giving gifts. You don't need to spend a fortune, just make this EASY gift box, fill it with homemade cookies, chex mix, socks, whatever and your recipient will LOVE IT! Go ahead and fill mine with Stampin' Up products, please :).  It's all about the packaging, which Stampin' Up makes cute and simple.

Day 2
Tag a Bag Gift Box:


Doesn't Christmas just call for sparkle???

Stampin' Up supplies used:
Tag a bag gift boxes
Paper: season of style designer series paper, whisper white 8 1/2" x 11" card stock, silver and red glimmer paper
Ink: cherry cobbler, gumball green markers. gumball green and chocolate chip classic stamp pad
Big Shot: circle card thinlits die (for the stars and ho ho ho frame pieces) OR holiday catalog carryover item (not pictured in catalog) merry minis punch pack can punch out the stars.
FOR A LINK TO HOLIDAY CARRYOVER ITEMS not listed in catalog CLICK HERE
tools: 2 2/8" scallop punch, stampin' sponge
embellishments: 3/4" cherry cobbler chevron ribbon, cherry cobbler baker's twine, basic rhinestones
adhesive: glue dots

Details:
Cut designer paper to fit across box and to fold 1 inch over the edge on each side, slide plastic sleeve over paper. Color stamp with cobbler and gumball green markers, stamp on whisper white card stock and punch out with scallop punch.  Place label thinlit from circle flip card thinlit die on back (white) side of silver glimmer paper and trace around the outside of the thinlit for the silver glimmer piece.  Cut white card stock with same label shape thinlit to get the shape with "ho ho ho" in it. Stamp "ho ho ho" in gumball green on the white cardstock piece and adhere to glitter outline piece with stampin' dimensional.  Cut stars with either merry minis punch pack star punch (carryover from catalog) or the circle card thinlits die star thinlit.  Attatch one to the other with glue dots.  Punch small hole in each of 3 labels, thread cherry cobbler twine through hold and attach it to the underside of the cherry cobbler cheveron bow. FILL WITH FUN!  The perfect gift!
 
 
Stay tuned tomorrow for day #3. Don't miss a day! subscribe to my blog today

Like papermadeprettier on Facebook and find me on Pinterest!

Friday, November 1, 2013

5 Thankful days of Thanksgiving projects from papermadeprettier, project #7

Hope you got enough candy last night! Welcome back!  If you missed the first 6 projects, click here: 5 Thankful Days Project #1.  I will post two projects a day for 5 days so that when you love them and want to make them, you will have plenty of time to make yours before the turkey comes to town! 

DAY 4:
Project #7
THANKFUL JOURNAL
 
 
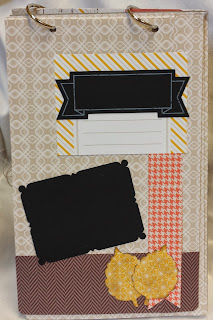
I got this fabulous idea from convention. It's a stepped-up project using the Thankful Tablescape Simply Created Kit. Isn't it dreamy?  I love the way all of these elements meld together. Here are the inside pages with photos!


Stampin' Up supplies used: (all but the naturals designer buttons, Truly Grateful stamp set, chocolate chip ink and stampin' sponge to soften up the leaf cuts were from the Thankful Tablescape Simply Created kit!)
paper: whisper white 8 1/2" x 11", sweater weather designer series paper, If you don't have the kit (WHY DON'T YOU? IT ROCKS!) you can use sweater weather designer series paper and the autumn accents bigz die, however, the chalkboard cut out black pieces are exclusive to the kit.
stamp sets: Truly Grateful
Big Shot: autumn accents bigz die (if you don't use the kit), bitty banners thinlit
ink: chocolate chip
embellishments: naturals designer buttons
adhesives: snail adhesive, stampin' dimensionals
misc: stampin' sponge, white stampin' chalk marker?, metal rings x 2

Details:
Cut cardboard piece that was in the Thankful Tablescape kit in half on the long end making the cardboard front and back covers (waste not, want not, right???).  Round the bottom edges with scissors.  Stack 2 halves back to back and punch 2 holes equal distance from edge through both halves (I used the cropadile tool - not Stampin' Up).  Front and back covers: cover front and back covers on both the front and back with the sahara sand/white paper. On front cover, layer a piece of birch paper.  Cut 1 strips of designer paper and cut the edge off of one of the "list" pieces with crushed curry diagonal stripes and cut an inverted "v" edge and layer the designer series papers strips.  Fold chocolate chip herringbone paper strip over on itself multiple times using glue dots on the inside to secure until it reaches from one side to the other, affix to front with glue dots.  Tie 3 pieces of linen thread around the journal in a bow.  Glue dot a naturals designer button on the knot of the bow.  Cut whisper white card stock using bitty banners thinlit die, stamp "thankful for" in chocolate chip ink. Write "journal" with stampin' chalk marker. Layer papers on other pages as desired.  Some examples are shown above.

DON'T miss project #8 this afternoon!  Subscribe to my blog so you won't miss a thing!  www.papermadeprettier.com.

To order these fabulous products online anytime, go to my online store: http://www.stampinup.com/ECWeb/default.aspx?dbwsdemoid=2006013

Questions? Email me: Kay Cogbill, papermadeprettier Stampin' Up Demonstrator
cogbill22@yahoo.com

Thursday, October 31, 2013

5 Thankful days of Thanksgiving projects from papermadeprettier, project #5

Are you enjoying these projects? I hope so! If you missed the first 2 projects, click here: 5 Thankful Days Project #1.  I will post two projects a day for 5 days so that when you love them and want to make them, you will have plenty of time to make yours before the turkey comes to town! 

DAY 3:
Project #5
Paper Pumpkin


This paper pumpkin was originally designed by Julie Davison, another very talented demonstrator. It is just so clever!  AND simple to make!
 
Stampin' Up supplies used:
paper: 8 1/2"x11" old olive card stock, sweater weather designer series paper. 
Big Shot: autumn accents bigz die
embellishments: glimmer brads (brights collection), linen thread, candy dot brad base
tools: paper piercing tool
adhesives: glue dots

Details:
Cut Designer paper into 10 strips 6"x1". Stack papers together, punch a small hole centered about 1/4" in from the end through them all (I use a large tool called a cropadile for that - not Stampin' Up). Stick brad through the end of one hole, colored glittery part facing up. Then fan out the pieces, bring them down to meet at the bottom and fasten from the bottom with the other brad. Cut olive colored leaves with Big Shot and autumn accents bigz die. Crumple and un-crumple the olive colored leaves.  Attach the leaves with glue dots and then tie the linen thread to the leaves. See? Simple!


DON'T miss project #6 this afternoon!  Subscribe to my blog so you won't miss a thing!  www.papermadeprettier.com.

To order these fabulous products online anytime, go to my online store: http://www.stampinup.com/ECWeb/default.aspx?dbwsdemoid=2006013

Questions? Email me: Kay Cogbill, papermadeprettier Stampin' Up Demonstrator
cogbill22@yahoo.com
Related Posts Plugin for WordPress, Blogger...